

Hello folks,
Long long time no see…
This section has suffered a bit in recent months, In any case I will try again to be as consistent as I can. I might soon create a full fledged SQL training on Gumroad so keep an eye out for that in coming weeks.
In case you missed the previous edition, here you go -

You have already seen in the subtitle of this newsletter, today we are going to tackle probably the most important topic in SQL - Joins!!!
What are Joins then?
Joins are one of the most powerful features in SQL that allow you to combine data from multiple tables based on related columns.
When working with relational databases, data is often distributed across various tables to reduce redundancy and improve efficiency. However, to retrieve meaningful information, you frequently need to bring this data together. That's where SQL joins come in.
The related columns are typically foreign keys in one table that reference primary keys in another. By using joins, you can create a result set that combines columns from the joined tables.
Basic SYNTAX of Joins
In SQL, there are two main syntaxes used for joins: ANSI (SQL-92) syntax and SQL-89 (also known as the Theta join) syntax. Let’s take a closer look at the two:
1. ANSI (SQL-92) Join Syntax
This is the modern and more readable syntax, which explicitly specifies the type of join being used. It's generally preferred due to its clarity and support for different join types.
Example of INNER JOIN using ANSI Syntax:
SELECT table1.column1, table2.column2
FROM table1
INNER JOIN table2
ON table1.common_column = table2.common_column;
2. SQL-89 (Theta) Join Syntax
This older syntax uses a comma to list the tables in the FROM clause and places the join condition in the WHERE clause. While still valid, it is less clear and does not explicitly specify the type of join, which can lead to confusion.
Example of INNER JOIN using SQL-89 Syntax:
SELECT table1.column1, table2.column2
FROM table1, table2
WHERE table1.common_column = table2.common_column;
Recommendation: Use the ANSI (SQL-92) syntax for better readability, maintainability and support for various types of joins.
All the types of Joins
There are several types of joins in SQL, each designed to retrieve data in different ways depending on the relationship between the tables. Let’s explore each type in detail:
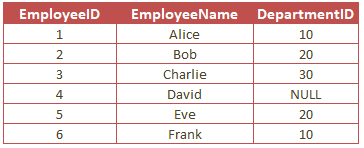
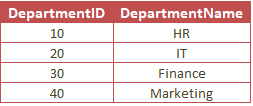
To effectively demonstrate the different types of SQL joins, let’s first create two hypothetical datasets:
Employees
and Departments
Now let’s get going with the types =
1. INNER JOIN
An INNER JOIN returns only the rows where there is a match in both tables. Rows without a match in either table are excluded from the result.

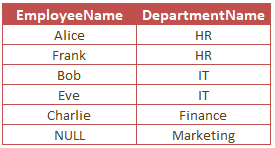
Example: Retrieve a list of employees along with their corresponding department names, but only for employees who have a department assigned.
The Query would look something like this -
SELECT Employees.EmployeeName, Departments.DepartmentName
FROM Employees
INNER JOIN Departments
ON Employees.DepartmentID = Departments.DepartmentID;
& the output like this -
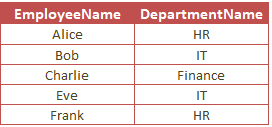
Only employees with a matching DepartmentID in the Departments table are included in the result.
2. LEFT (OUTER) JOIN
A LEFT JOIN returns all the rows from the left table (Employees) and the matched rows from the right table (Departments). If there is no match, the result is NULL on the side of the right table.

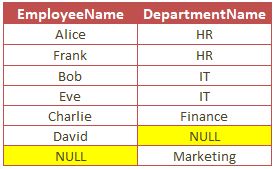
Example: Retrieve a list of all employees, including those who do not have an assigned department.
The Query would look something like this -
SELECT Employees.EmployeeName, Departments.DepartmentName
FROM Employees
LEFT JOIN Departments
ON Employees.DepartmentID = Departments.DepartmentID;
& the result -
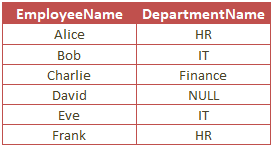
Notice, The query includes all employees. For David, who doesn’t have a DepartmentID, the DepartmentName is NULL.
3. RIGHT (OUTER) JOIN
A RIGHT JOIN returns all the rows from the right table (Departments) and the matched rows from the left table (Employees). If there is no match, the result is NULL on the side of the left table.

Example: Retrieve a list of all departments, including those that don’t have any employees.
The query -
SELECT Employees.EmployeeName, Departments.DepartmentName
FROM Employees
RIGHT JOIN Departments
ON Employees.DepartmentID = Departments.DepartmentID;
& the output -
Note, The query includes all departments. The Marketing department has no employees, so EmployeeName is NULL.
4. FULL (OUTER) JOIN
A FULL JOIN returns all rows when there is a match in either the left (Employees) or right (Departments) table. If there is no match, the result is NULL on the side that does not have a match.

Example: Retrieve a complete list of all employees and departments, including employees without departments and departments without employees.
Query -
SELECT Employees.EmployeeName, Departments.DepartmentName
FROM Employees
FULL JOIN Departments
ON Employees.DepartmentID = Departments.DepartmentID;
The result -
The result includes all employees and all departments. David and the Marketing department have no matches, so their respective columns show NULL.
Apart from these 4 main join types there are other joins that exist that have more specific use cases. Here is a quick intro to those -
5. CROSS JOIN
A CROSS JOIN returns the Cartesian product of the two tables, which means it returns all possible combinations of rows between the tables.
Example: Generate a list of all possible employee-department pairings, regardless of whether they are actually related.
SELECT Employees.EmployeeName, Departments.DepartmentName
FROM Employees
CROSS JOIN Departments;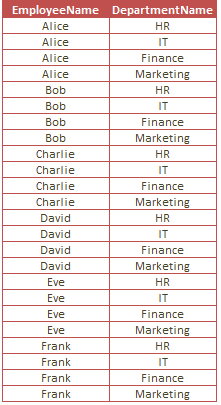
The CROSS JOIN produces every possible combination of employees and departments. This results in 24 rows (6 employees × 4 departments).
6. SELF JOIN
A SELF JOIN is when a table is joined with itself. This can be useful for comparing rows within the same table, such as finding relationships between employees.
Example: Find pairs of employees who work in the same department.
SELECT A.EmployeeName AS Employee1, B.EmployeeName AS Employee2, A.DepartmentID
FROM Employees A, Employees B
WHERE A.DepartmentID = B.DepartmentID
AND A.EmployeeID <> B.EmployeeID;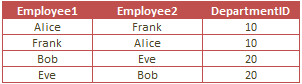
This query pairs employees who belong to the same department, excluding the pairs where an employee would be matched with themselves.
7. NATURAL JOIN
A NATURAL JOIN automatically joins tables based on columns with the same name and datatype in both tables. It’s a shorthand for a regular join when the columns match exactly.
Example: Assuming both Employees and Departments tables have a column DepartmentID, retrieve the list of employees along with their department names.
SELECT EmployeeName, DepartmentName
FROM Employees
NATURAL JOIN Departments;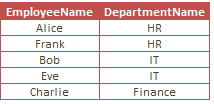
The NATURAL JOIN automatically detects the DepartmentID column as the common column and performs an INNER JOIN.
Best Practices for Using Joins in SQL
1. Understand the Data
Importance: Before using a join, it’s crucial to fully understand the structure and relationships of the tables you are working with. This includes knowing the primary keys, foreign keys, and how the data in different tables is related. Without this understanding, you might create incorrect joins, leading to inaccurate results.
How to Apply:
Analyze Table Relationships: Review the database schema or use tools to visualize the relationships between tables. Understand which tables are related through foreign keys and how these keys connect different data entities.
Know Your Keys: Identify primary and foreign keys in your tables. Primary keys uniquely identify a record in a table, while foreign keys link records between tables. Understanding these keys is essential for writing accurate joins.
Test with Simple Queries: Start with simple
SELECTqueries to inspect data from each table separately. This helps you become familiar with the data before combining it.
Example: If you are joining an Orders table with a Customers table, knowing that CustomerID is the primary key in Customers and a foreign key in Orders allows you to correctly join these tables.
2. Use Aliases
Importance: Aliases (shortened names for tables or columns) make your SQL queries more readable and easier to maintain, especially when working with multiple tables or columns that have similar names.
How to Apply:
Assign Short Names: When writing a join, give each table an alias, usually a short, descriptive name. This reduces the amount of typing required and makes the query more readable.
Avoid Ambiguity: If multiple tables have columns with the same name, using aliases prevents confusion by clearly indicating which table each column belongs to.
Example: Without aliases:
SELECT Employees.EmployeeName, Departments.DepartmentName
FROM Employees
INNER JOIN Departments
ON Employees.DepartmentID = Departments.DepartmentID;
With aliases:
SELECT E.EmployeeName, D.DepartmentName
FROM Employees E
INNER JOIN Departments D
ON E.DepartmentID = D.DepartmentID;Explanation: Using E and D as aliases for Employees and Departments makes the query shorter and easier to read, while still being clear.
3. Optimize Performance
Importance: Joins, especially on large datasets, can be resource-intensive. Optimizing performance is essential to ensure your queries run efficiently without unnecessarily consuming time and computing resources.
How to Apply:
Index Columns: Ensure that the columns used in join conditions (typically primary and foreign keys) are indexed. Indexes speed up data retrieval operations, significantly improving join performance.
Use INNER JOIN by Default:
INNER JOINis often more efficient thanOUTER JOINbecause it only returns matching rows. If you don’t need non-matching rows, preferINNER JOIN.Avoid SELECT * in Joins: Select only the columns you need, instead of using
SELECT *. This reduces the amount of data transferred and processed, improving performance.Limit Result Sets: If you’re working with large tables, consider using the
LIMITclause to restrict the number of rows returned or filtering data as much as possible before joining.
Example:
CREATE INDEX idx_department_id ON Employees(DepartmentID);Explanation: Creating an index on DepartmentID in the Employees table speeds up queries that join Employees with other tables on this column.
4. Beware of Cartesian Products
Importance: A Cartesian product occurs when you use a CROSS JOIN or forget to specify a JOIN condition. This results in every row from one table being paired with every row from the other table, potentially creating an enormous and unintended result set.
How to Apply:
Use CROSS JOIN Sparingly:
CROSS JOINshould only be used when you explicitly want to combine every row from two tables. Be cautious with large tables, as the result set can grow exponentially.Always Specify Join Conditions: Ensure that you include
ONclauses in your joins to prevent unintended Cartesian products. Double-check your query logic to confirm that it accurately represents the intended relationships between tables.
Example: Accidental Cartesian product:
SELECT E.EmployeeName, D.DepartmentName
FROM Employees E, Departments D;
This query returns every combination of employees and departments, regardless of any relationship between them.
Proper join:
SELECT E.EmployeeName, D.DepartmentName
FROM Employees E
INNER JOIN Departments D
ON E.DepartmentID = D.DepartmentID;Explanation: The corrected query only returns rows where the DepartmentID matches, avoiding a Cartesian product.
5. NULL Handling
Importance: Understanding how NULL values are treated in SQL joins is crucial, particularly with OUTER JOIN operations. NULL values can affect the result set and lead to unexpected or incorrect results if not handled properly.
How to Apply:
Be Aware of NULLs in OUTER JOINS: In
LEFT JOINorRIGHT JOIN, unmatched rows from one side of the join will result inNULLvalues for the columns of the other table. Ensure that your query logic accounts for this.Use COALESCE: The
COALESCEfunction allows you to substituteNULLvalues with a default value, making the result set easier to interpret.Careful with WHERE Clauses: Applying a
WHEREclause to columns that might containNULLvalues can unintentionally filter out rows. Consider moving such conditions to theONclause of the join instead.
Example:
SELECT E.EmployeeName, COALESCE(D.DepartmentName, 'No Department') AS DepartmentName
FROM Employees E
LEFT JOIN Departments D
ON E.DepartmentID = D.DepartmentID;Explanation: In this query, if an employee doesn’t have a department, the COALESCE function replaces NULL with ‘No Department’. This makes the result set more informative and easier to understand.
Pheww.. that’s a lot of Joining! New let’s talk about some SUBquerying!
Sub Queries
Subqueries, or nested queries, are a powerful feature in SQL that allow you to perform more complex data retrievals and manipulations by embedding one query inside another. Understanding this concept will significantly enhance your SQL skills, enabling you to solve more complex problems with elegance and efficiency!
The subquery can be placed in different parts of a SQL statement, such as the SELECT, FROM, WHERE, or HAVING clauses. The main query, or outer query, uses the result of the subquery to further refine its own operation.
Example: Suppose we have two tables: Orders and Customers.
Orders: Contains order details.Customers: Contains customer details.
If we want to find all customers who have placed orders, we could use a subquery like this:
SELECT CustomerName
FROM Customers
WHERE CustomerID IN (SELECT CustomerID FROM Orders);
Here, the subquery (SELECT CustomerID FROM Orders) retrieves all CustomerIDs from the Orders table, and the outer query selects the names of those customers from the Customers table.
Types of Subqueries
Subqueries can be classified based on their usage and results:
1. Single-Row Subqueries
These subqueries return a single row of results. They are often used in WHERE, HAVING, and SELECT clauses when you need to compare a single value.
Example:
SELECT EmployeeName
FROM Employees
WHERE Salary = (SELECT MAX(Salary) FROM Employees);
This query retrieves the name of the employee with the highest salary. The subquery returns the maximum salary, and the outer query selects the employee with that salary.
2. Multi-Row Subqueries
These subqueries return multiple rows. They are often used with operators like IN, ANY, ALL, or EXISTS.
Example:
SELECT ProductName
FROM Products
WHERE ProductID IN (SELECT ProductID FROM OrderDetails WHERE Quantity > 10);
This query finds all products that have been ordered in quantities greater than 10. The subquery returns the ProductIDs of those products, and the outer query retrieves the product names.
3. Correlated Subqueries
A correlated subquery is a subquery that refers to columns from the outer query. Unlike other subqueries, a correlated subquery is executed once for each row processed by the outer query.
Example:
SELECT E1.EmployeeName, E1.Salary
FROM Employees E1
WHERE E1.Salary > (SELECT AVG(Salary) FROM Employees E2 WHERE E1.DepartmentID = E2.DepartmentID);
This query selects employees who earn more than the average salary in their department. The subquery computes the average salary for the department of each employee in the outer query.
4. Scalar Subqueries
A scalar subquery returns a single value (a single row with a single column). Scalar subqueries can be used wherever a single value is expected, such as in SELECT or WHERE clauses.
Example:
SELECT ProductName, (SELECT AVG(Price) FROM Products) AS AvgPrice
FROM Products;
This query lists each product along with the average price of all products. The subquery returns the average price, and this value is included in the result set for each row.
Where Can Subqueries Be Used?
Subqueries are versatile and can be used in various parts of a SQL query:
1. Subqueries in the SELECT Clause
Subqueries in the SELECT clause allow you to include additional computed data in the result set.
Example:
SELECT OrderID, (SELECT COUNT(*)
FROM OrderDetails
WHERE OrderDetails.OrderID = Orders.OrderID) AS ItemCount FROM Orders;
This query lists each order along with the count of items in that order.
2. Subqueries in the WHERE Clause
Subqueries in the WHERE clause are used to filter the rows returned by the outer query based on the results of the subquery.
Example:
SELECT CustomerName
FROM Customers WHERE CustomerID IN (SELECT CustomerID FROM Orders WHERE OrderDate = '2024-01-01');
This query retrieves the names of customers who placed orders on January 1, 2024.
3. Subqueries in the FROM Clause
Subqueries in the FROM clause, sometimes called inline views, allow you to treat the result of the subquery as a temporary table.
Example:
SELECT AVG(ItemCount) AS AvgItemsPerOrder
FROM (SELECT OrderID, COUNT(*) AS ItemCount FROM OrderDetails GROUP BY OrderID) AS OrderSummary;
This query calculates the average number of items per order. The subquery in the FROM clause generates a temporary table with the order counts, which the outer query then averages.
4. Subqueries in the HAVING Clause
Subqueries in the HAVING clause allow you to filter groups based on aggregate data.
Example:
SELECT DepartmentID, COUNT(*) AS EmployeeCount
FROM Employees GROUP BY DepartmentID HAVING COUNT(*) > (SELECT AVG(EmployeeCount) FROM (SELECT DepartmentID, COUNT(*) AS EmployeeCount FROM Employees GROUP BY DepartmentID) AS DeptSummary);
This query finds departments that have more employees than the average department size.
Best Practices for Using Subqueries
Simplify with CTEs: For complex subqueries, consider using Common Table Expressions (CTEs) to improve readability and maintainability. We will tackle CTEs in the next edition of TOOLs & i swear the next wont take that long! :)
Performance Considerations: Be mindful of performance, especially with correlated subqueries. They can be slow because they run once for each row processed by the outer query.
Use EXISTS Over IN: When dealing with large datasets, consider using
EXISTSinstead ofIN, asEXISTScan be more efficient.
Avoid Nested Subqueries Where Possible: Deeply nested subqueries can be hard to read and maintain. Try to flatten your queries or use joins and CTEs where applicable.
& that’s it for the most important lesson in this SQL series. in the next edition we will talk about CASE statements, STRING functions, CTEs & Window functions, so yes some really advanced SQL stuff.
See you next time,
Raghunandan 🎯
& If it’s your first time here, TheWeekendFreelancer currently has 5 ongoing series - Tools 🛠️, Maths 📈, Domain 🌐, Trends 📻 & My Notes 📝. Have fun reading!
P.S. - “The Weekend Freelancer” is a reader backed publication. Share this newsletter with your friends and relatives & consider becoming a free or paid member of this newsletter. Every subscription gives me an extra ounce of motivation to keep going 💪!
You can also support my work here. Cheers!
If you are looking for detailed training content related to Analytics tools, you can find it here - Power BI